Contents
How to Disable Keyboard on Windows Laptop
If you use an external keyboard or touchscreen display on your Windows laptop, you rarely need to use the built-in keyboard. Additionally, the built-in keyboard can be counterproductive. Therefore, disabling the laptop keyboard can be a practical option. In this article, we will guide you on how to disable it.

The methods in this article are divided into two categories: one that temporarily disables the keyboard, which is what most people want, and the other that permanently disables the keyboard. Let’s begin by temporarily disabling the keyboard on your Windows machine.
How to Temporarily Disable Laptop Keyboard
To temporarily disable your laptop keyboard on a Windows operating system, follow these steps:
1. Press the Windows key + X to open the Windows Mobility Center.
2. Click on “Device Manager” in the list of options presented.
3. Expand the “Keyboards” category to reveal a list of installed keyboards.
4. Right-click on the laptop keyboard and select “Disable” from the context menu.
5. Confirm the action if prompted by the system.
Once you have successfully disabled the laptop keyboard, you can use an external keyboard or mouse to navigate and input on your laptop. To re-enable the keyboard, simply follow the same steps and select “Enable” instead of “Disable”.
1. Shut off the Keyboard Using the Device Manager on Windows
You can easily disable the built-in keyboard on your laptop. The steps are simple. Follow these steps:
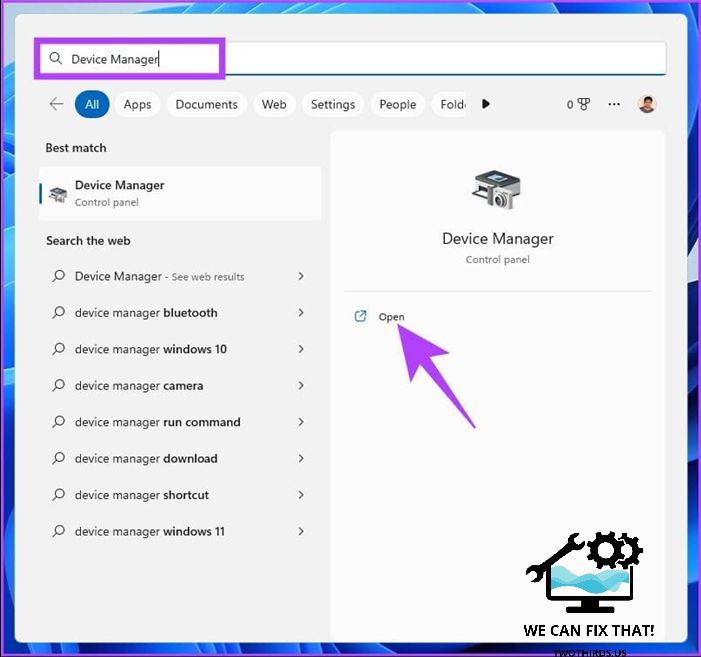
Step 1: Press the Windows key on your keyboard, type “Device Manager,” and click Open.
Tip: Alternatively, you can open the Run command box using the keyboard shortcut “Windows key + R,” type “devmgmt.msc” in the text box, and press Enter.

Step 2: In the Device Manager, double-click on Keyboards.

You will find a list of keyboards currently connected to your laptop, including the built-in one.
To uninstall the built-in keyboard, right-click on it and select Uninstall device from the context menu.
Please note that some laptops may show the option to Disable device, which will have the same effect.

Step 4: In the prompt, click Uninstall.

That’s it. You have disabled your laptop keyboard on Windows. This is not a permanent solution. The setting will remain until you restart your machine. Move on to the next method if you want a longer-lasting solution without following a long list of steps.
2. Disable the Keyboard Using the Wrong Driver on Windows
This method extends the previous one, allowing you to disable the keyboard for a longer period of time until you decide to revert. Follow these steps:
1. Press the Windows key, type “Device Manager,” and click Open.
Alternatively, open the Run command box using the keyboard shortcut “Windows key + R,” type “devmgmt.msc,” and press Enter.

Step 2: In the Device Manager, select and double-click Keyboards.

You will see a list of all keyboards connected to your laptop, including the built-in one.
Step 3: Go to the built-in keyboard, right-click, and choose Update driver from the menu.

Step 4: Open the Update Drivers window and choose the option to browse for drivers on your computer.

Step 5: On the next screen, browse the file location. Click ‘Let me pick from a list of available drivers on my computer.’

Step 6: Uncheck the ‘Show compatible hardware’ option, choose a different manufacturer for your standard keyboard, and click Next.

Click Yes to confirm the installation of the potentially incompatible driver.

Step 7: Finally, when asked to restart your computer, click Yes.

Once the laptop returns from reboot, your keyboard won’t work. To revert, simply follow steps 1-4. Instead of selecting ‘Browse my computer for drivers,’ select ‘Search automatically for drivers.’
How to Permanently Disable Laptop Keyboard
There are several ways to permanently disable your laptop keyboard. Below are the main methods. Let’s get started.
1. Turn off the Keyboard Using the Command Prompt on Windows
Using Command Prompt to disable the built-in laptop keyboard is easy. Follow these steps. Step 1: Press the Windows key, type Device Manager, and open it. Tip: Alternatively, you can use the keyboard shortcut Windows key + R to open the Run command box, type devmgmt.msc, and press Enter.

Step 2: In the Device Manager window, double-click on Keyboards.

You will see a list of all keyboards connected to your laptop, including the built-in one.
Step 3: Navigate to the built-in keyboard, right-click, and select Uninstall device from the context menu.
Note: Some laptops may not have the Uninstall device option; instead, you will find the Disable device option. However, the outcome will be the same.

Step 4: In the prompt, click Uninstall and close all tabs.

Step 5: Press the Windows key on your keyboard, type Command Prompt, and click on ‘Run as administrator.’

Review text:
“In the prompt, click on Yes. Step 6: In the Command Prompt, type the below command and hit Enter. sc config i8042prt start=disabled.”

This command prevents Windows from re-enabling the keyboard upon computer restart, providing a permanent solution. Finally, restart your laptop. You have now disabled your laptop’s built-in keyboard. To enable the keyboard again, type and execute the following command, then restart your computer.
sc config i8042prt start= auto

If you don’t want to disable the keyboard using Command Prompt, you can use Group Policy Editor on Windows Pro or Enterprise versions. The Home Edition does not have the Policy Editor. Jump to the next method to find out how.
2. Deactivate the Keyboard Using the Group Policy Editor on Windows
Step 1: Press the Windows keys on your keyboard, type gpedit, and click Open.

Step 2: In the left pane, select Computer Configuration.

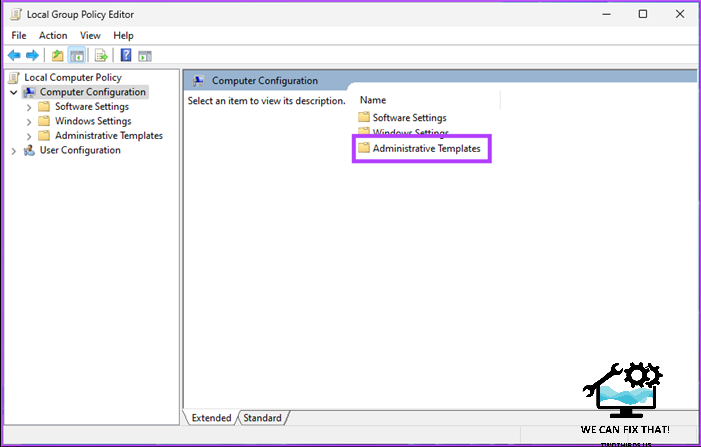
Step 3: In the right pane, double-click on Administrative Templates.

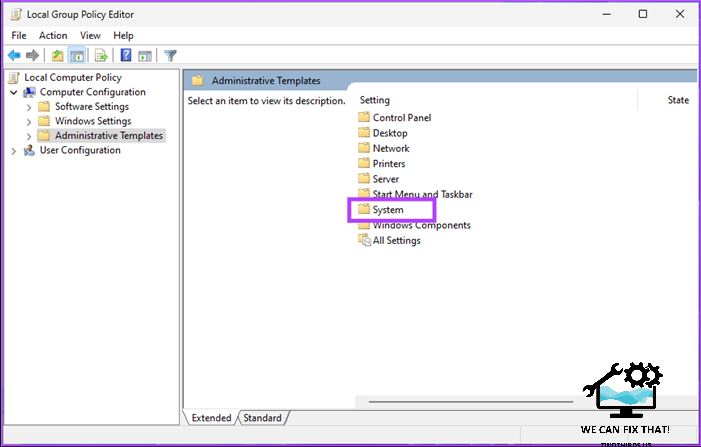
Step 4: Select the System option.
In this step, select the System option.

Step 5: Under System, find Device Installation and double-click it.

Step 6: Go to ‘Device Installation Restrictions.’

Step 7: Double-click the ‘Prevent installation of devices not described by other policy settings’ option and choose Edit.

Step 8: In the ‘Prevent installation of devices not described by other policy settings’ window, enable the option, click Apply, and then OK.

Now, close all tabs.
Step 9: Press the Windows key, type Device Manager, and open it.
Tip: Alternatively, you can open the Run command box using the keyboard shortcut ‘Windows key + R’, type ‘devmgmt.msc’ in the box, and press Enter.

Step 10: In Device Manager, double-click on Keyboards.

A list of keyboards connected to your laptop, including the built-in one, will be shown to you.
Step 11: Go to the built-in keyboard, right-click, and choose Uninstall device from the menu.
Note: Some laptops may not have the Uninstall device option; instead, you will find the Disable device option. Click on it.

Step 12: In the prompt, click Uninstall.

By disabling your laptop’s built-in keyboard, you can also enable it later by following these steps: Step 1 to Step 7. Then, in Step 8, choose the Enabled option under ‘Prevent installation of devices not described by other policy settings.’ Finally, click on Apply and OK.
FAQs on Disabling Laptop Keyboard
1. Yes, it is possible to lock the keyboard on your laptop. To do this, you need to go to the Device Manager in Windows and disable the keyboard device. This will prevent any input from being registered, effectively locking the keyboard.
2. Unfortunately, once you disable the keyboard on Windows, you will no longer be able to view your keyboard history. In order to see your keyboard history again, you will need to re-enable the keyboard.
Get Rid of Your Laptop’s Keyboard
Now that you know how to disable your laptop keyboard, you can avoid accidental key presses. We have provided temporary and permanent disablement options; choose wisely. Also, don’t forget to enable the keyboard again if you plan to ditch the external keyboard.
As Fred Humiston, the author behind Twothirds.us, I focus on providing practical and easy-to-follow guides and solutions for a variety of technical issues that people commonly face.
My articles cover a wide range of topics, from troubleshooting out-of-sync audio on TikTok and managing Firestick devices, to understanding the impact of Capcut on video quality and resolving sound issues on Hisense Roku TVs.
I also delve into more general tech tips, like how to block numbers on landlines or use VPNs without Wi-Fi. My goal is to make technology more accessible and less intimidating for everyone, whether you’re a tech novice or a seasoned user. I strive to offer clear, concise, and helpful advice to make your digital experience smoother and more enjoyable.
