Contents
- 1 How to Create a Different Header and Footer for Each Page in Google Docs
- 1.1 What Are Section Breaks in Google Docs
- 1.2 Add Different Header and Footer for Pages in Google Docs
- 1.3 How to View and Delete Section Breaks
- 1.4 How to Insert Header or Footer Only on First Page in Google Docs
- 1.5 Add Page Numbers in Headers and Footer of Google Docs
- 1.6 Remove Header & Footer
- 1.7 No Breaks, Please!
In a Google Docs document, the header and footer appear on all pages. However, if you want to use different headers and footers for certain pages, some adjustments are needed.

Sometimes, a small adjustment can cause sleepless nights. Finding an option in Docs settings for separate headers can be disappointing because there isn’t a dedicated switch for it.
To customize headers and footers in Google Docs, you will need to use sections. Here’s what you need to do, but first, let’s understand section breaks. We will also cover how to create a separate header and footer for the first page.
What Are Section Breaks in Google Docs
When creating a document in Docs, all pages have the same formatting, including headers, footers, footnotes, page numbers, and margins. But what if you need to divide your document into sections, such as when writing a book with multiple chapters and you want each chapter to have its own header? This is where section breaks come in. Section breaks allow you to divide your document into independent sections with different formatting options, such as margins, footers, and numbering. To insert a different header or footer for specific pages in Docs, simply add a section break before the section you want to change.
To add a customized header or footer in a Google Docs document, follow these steps:
1. Open your document in Google Docs.
2. Go to the page where you want to have a different header or footer. Place your cursor at the end of the last sentence on the previous page.
3. Click on “Insert” in the top menu and select “Break,” then choose “Section break (next page).”
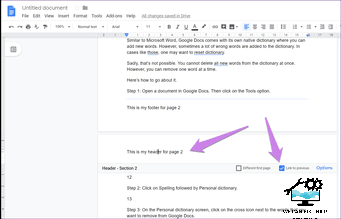
4. Now, a section break has been added. To unlink the header and footer, uncheck the “Link to previous” option for each section separately.

Step 4: Click on your cursor, and a section break line will be added. Then, uncheck “Link to previous” in the header section of the current page.

Step 5: Add header content. Press Esc to close the header.
Step 6: Scroll down and click on the footer area. Uncheck Link to previous as the header and footer work independently in sections. Then add your footer content.

Scrolling up, you’ll notice that the header and footer differ from the pages above. However, the pages below retain the same header and footer because they belong to the current section.
To achieve different headers or footers for each page, you must repeat the above steps for every page. This is particularly useful when organizing chapters, as each chapter contains multiple pages. Therefore, you must perform this action after a set of pages.
To recap, position the cursor on the page preceding the one where you desire a unique header or footer, ensuring it is after the final word.
How to View and Delete Section Breaks
To view the section breaks in your document, go to the View menu and check Show section breaks. A blue dotted line signifies it. To hide the section breaks, uncheck Show section breaks.

To delete a section break, place the cursor at the end of the last word before the break, then hit the Delete key.

The first page typically contains the Table of Contents. To customize the header or footer of this page, simply click on it and select “Different First Page.” From there, you can edit the header and footer to your liking. If you prefer not to have a header or footer on the first page, you can delete the existing text.

You don’t have to enter page numbers manually in Google Docs. A native feature exists for that. To add page numbers, go to Insert > Header and page number > Page number. Then choose whether to add numbers in the header or footer. You can also start numbering from the second page by selecting the second option.

To remove a header or footer, click on it and select Format in the top menu. Then, choose Headers & Footers and click on Remove header or Remove footer, depending on the selected area.

No Breaks, Please!
The method mentioned above is the best way to create separate headers and footers in Google Docs. However, it’s tedious to do it for every page. We hope Google introduces a direct way to achieve it, just like they did with separate headers for the first page.
Next up: Did you mess up a Google Docs setting? Don’t worry. Check our guide to learn how to reset settings on Google Docs.
As Fred Humiston, the author behind Twothirds.us, I focus on providing practical and easy-to-follow guides and solutions for a variety of technical issues that people commonly face.
My articles cover a wide range of topics, from troubleshooting out-of-sync audio on TikTok and managing Firestick devices, to understanding the impact of Capcut on video quality and resolving sound issues on Hisense Roku TVs.
I also delve into more general tech tips, like how to block numbers on landlines or use VPNs without Wi-Fi. My goal is to make technology more accessible and less intimidating for everyone, whether you’re a tech novice or a seasoned user. I strive to offer clear, concise, and helpful advice to make your digital experience smoother and more enjoyable.
